Monday, October 31, 2011

Happy Halloween!


and this years costume.....


Wishing everyone a safe and fun Halloween!!

Tuesday, October 25, 2011

Some Halloween Crafts

I am apologizing in advance for the quality of these photos. Our computer is still broken, (waiting for a part to come in the mail) so I can't process any of my digital camera photos. These photos are from my camera phone and it has very poor resolution. Anyway, I thought that sharing something was better than nothing :)

Slime
This has been on my list for a while and Halloween seemed like a great time to try it. It was amazingly easy and turned out perfectly slimy.


I got the slime recipe from here:
In a bowl dissolved 1 tsp of Borax in 1 cup of water. In a separate bowl mix 1/2 cup of white glue (Elmer's) in 1/2 cup of water, also you can add some food coloring if desired.. When both bowls are well mixed simply combine them together and your slime starts to form instantly. Continue mixing as long as possible, you can take it out and knead it with your hands. There will be some water left in the bowl, just dump it out. Your slime is ready to play with. Store you slime in a sealed container or zip lock bag.

Frankenstein

This idea for super cute toilet paper roll Frankenstein I saw on No Time For Flash Cards. Alex painted a tp roll green. I cut a jagged strip of black construction paper for hair and Alex glued it on. He also glued on a orange nose and some googly eyes. I punched some holes in the sides and Alex added some golf tees as bolts. We drew on a mad looking mouth.

We have been reading a lot of great Halloween books

Tuesday, October 18, 2011

A Little Halloween Inspiration

So my husband accidentally broke our computer the other day trying to clean the dust out of the fan. So I can't share any of the photos from the activities we have been doing :(  Hopefully he will have it fixed next week. In the meantime I thought I share some of the inspiring Halloween activities we are planning on doing next week. We are very excited for Halloween! These are all saved on my board on Pinterest. I am totally addicted to Pinterest. If you haven't yet checked it out I suggest you do. I find so much great inspiration there.

Boo-nilla Shakes  from Martha Stewart
Leaf Ghosts from Disney Family
Halloween Slime from What Do You Do All Day?
TP Frankenstein from No Time For Flashcards
Halloween Paint Chip Cards from Angela Sgro Designs
Q-Tip Skeleton from Crafts For All Seasons
Monster Mash Popcorn from In Katrina's Kitchen
Paper Plate Ghost Windsock from Kaboose
Coffee Filter Spider Webs from the Artful Parent
Halloween Pre-k Pack from Over the Big Moon
H is for Halloween printables from Oopsey Daisy
Footprint Ghost and Handprint Spider from Handprint and Footprint Art
Hopefully I will be sharing our versions of these crafts next week. Fingers crossed!

Wednesday, October 12, 2011

I've Got My Eye on You

 
This week we are focusing on the letter "E". So with Halloween coming up I thought it would be fun to do a eye theme. We started out by talking about everyone's eye color. I took some close up photos of Alex's gorgeous eyes so he could look at them closely.


 I couldn't find any eye themed printables so I created my own. I made a tracing page get the eye to the glasses and practicing writing E's, I drew a giant eye that Alex wanted to color with Do A Dots, and we practiced counting googly eyes. 


We made some crazy eyed hand and foot  print monsters. I was inspired by Little Learners Lounge's Math Monsters.


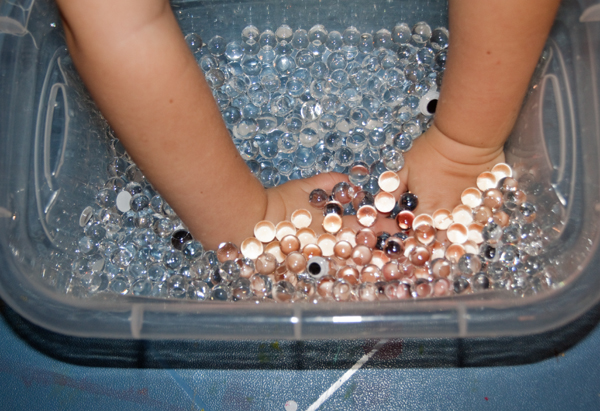
But Alex's absolute favorite thing we did was an "Eyeball" sensory bin. I saw this on I Can Teach My Child and I knew we had to try it. To make this I used water beads and googly eyes. I found hydrated ones at the Dollar Tree about a month ago and have been saving them. You can buy them hydrated or dehydrated. Water beads are water absorbent polymers that are non-toxic and biodegradable, they come in a variety of colors and are usually used for floral arrangements. You just want to make sure little ones don't put them in their mouths.


They really are so fun to squish and play with. Alex has been loving them. I'm not sure how long they will last, but they still look good a day later.

For dessert I made Alex some eyeball cookies. Yum!

They are a half of a Golden Oreo, a blue M&M and some red food coloring for the veins. The idea was from Craftberry Bush.

The Eye books we read:


Monday, October 10, 2011

Halloween Sensory Bin

Alex is so interested in Halloween this year. So I couldn't wait to make him a sensory bin! He loved it!

Everything I used, I already had on hand. All the Halloween goodies are from last year and the base is corn and black beans that I mixed together. I had them both left over from previous sensory bins. So what's inside?
  • Corn
  • Black beans
  • Halloween themed erasers
  • Plastic pumpkin baskets
  • pumpkin ice tray
  • little fabric bag with pumpkins on it
  • Orange cup
  • Tongs
  • plastic spoon
  • plastic Halloween toys (bats, spiders, snakes, skeleton, scorpion)
  • stretchy rats and spiders
  • orange and purple pompoms
  • Eyeball
Alex is having a great time playing/ pretending with it. The bat is swooping out of the air catching pom poms and rats. LOL

He's been filling the pumpkin baskets and bag with corn and beans, and passing it around saying its candy. He's also filled the pumpkin ice tray with the corn and beans and baked cupcakes in his toy oven.
So far this has been very popular. I am interested to see what other pretend play will come from it.

Sunday, October 9, 2011

D is for Dinosaur

Alex loves dinosaurs so we of course had a D is for dinosaur day.


He made a Letter D dinosaur. I guess it reminded him of a snake because he gave it a snake tongue. I cut out all the pieces and directed him how to glue it together.

Another craft we did a glue resist dinosaur skeleton. I saw this on Pinterest, but the original post is from That Artist Women. I just drew a very rough skeleton of a dinosaur in glue. Once it was dry, Alex painted over it with brown paint to reveal the skeleton.


About a week ago we made some salt dough "fossils" in preparation for Dino Day. I used a simple salt dough recipe:

Ingredients
1 cup salt
2 cups all purpose flour
1 cup luke warm water

Directions
1. In a large bowl mix salt and flour.
2. Gradually stir in water. Mix well until it forms a doughy consistency.
3. With your hands form a ball with your dough and kneed it for at least 5 minutes. The longer you kneed your dough the smoother it will be.
When our dough was ready we rolled it out to about a 1/2 inch thickness and pressed some small plastic dinosaurs in the dough. I cooked them in the oven at 200 degrees for about 1 hour but they were still soft. They air dried the rest of the week.


We finally got a sunny day this week so I buried them in Alex's sandbox and let him go on a "dino dig." It was a fun activity, I made about 6 of them and Alex wanted me to "hide" them again and again for him to find. He really liked finding them, brushing them off and then blowing off the sand.


We also did some worksheets from 2 Teaching Mommies' Dinosaur preschool pack.


Counting Dinos


Sorting small, medium and large dinos


Do a Dot Letter D is for dino


For lunch I made Alex a sad little peanut butter and jelly dino sandwich with some candy corn spikes. I really need to step up my creativeness with the themed food. LOL


The books we read were:


Check out some of our other dinosaur related activities here.