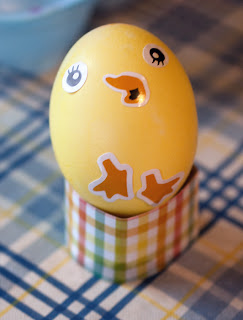
Make them into grass head eggs, of course! We had a few eggs that cracked when I was blowing out the egg contents. I cracked the tops off and we colored them anyway. We added some soil and some grass seed. We had some "face" stickers that came with a egg decorating kit, that Alex used to created some faces on the eggs. We watered them and put them by the window. In a couple of days the grass began to sprout.
Thursday, April 28, 2011
Tuesday, April 26, 2011
Garden Sensory Bin
Time for a new sensory box. Since spring is in the air, I decided I would make Alex a garden box.
The "dirt" in the box is some old coffee and espresso beans that my Mom was going to throw away.
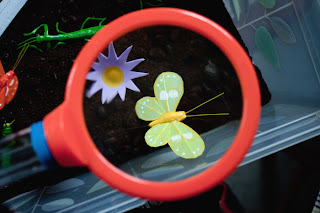
I purchased the spade, rake, magnifying glass and butterflies at the Dollar Tree for $3. We already had the other insects, play veggies, terra cotta plant pot and flowers (really textured paint brushes).
I added a piece of styrofoam under the coffee grounds so that the flowers and butterfly would stand up. Plus Alex can move and "plant" them.
I printed a template for the seed packet from here. I took some of the espresso beans and painted them to make "seeds."
This box will be a jumping off point for some seed, plant, vegetable/food, and insect lessons. Also some sorting games. Plus it is just fun to dig in and explore.
Thursday, April 21, 2011
Decorating Easter Eggs
This should be our last Easter post. Boy we were busy creating this Easter, I think because Easter was so late. Anyway here are our Easter Eggs. Alex really enjoyed the whole process and they came out so cute!
We read a cute little book in the morning, Ollie's Easter Eggs by Olivier Dunrea.
This is part of Dunrea's Gossie and friends series. It is about a group of goslings on a farm. The older goslings are all busy dying and hiding Easter eggs. Ollie is too busy playing. When he see the eggs, Ollie wants Easter eggs too and he has a plan on how he'll get them. When they hide their eggs, Ollie finds them and stashes them away in his nest. He unknowingly created a Easter egg hunt for the older goslings. The illustrations are very cute. We enjoyed the book a lot.
So here is our eggs. We used a simple Dollar Tree egg dying kit and some egg decorating stickers from Target.
 |
| Yes, the ones in back are meant to be have holes on top, they are for tomorrow's project. |
 |
| Adding glitter, his favorite part. |
Hope everyone has a happy and fun Easter!
Tuesday, April 19, 2011
Wet Felted Eggs and a Chick
I had purchased a bag of wool roving from Etsy, last fall to try some wet felting. I made a few acorns that I wasn't impressed with. I decided to give it another try when I saw how a tutorial on wet felted Easter Eggs from here. It was a lot of fun, and I love how they turned out. They would be a lot of fun for older children to make, but my three year old wouldn't have the patience to complete it. This is a how I created mine.
First I decided on what color wool roving I wanted to use. This is a bag of miscellaneous size pieces and colors of wool. It is perfect for little craft projects like this. I also taped the opening and the little holes in the end of a plastic Easter egg as to keep the water from collecting inside the egg and it taking forever to dry.
Next, I loosely wrapped the roving around the egg like a burrito. Try to fluff the wool and not have any thick edges. Then it was time to dunk it into some warm soapy water. (You can use dish soap or hand soap) The wool feels like a loose mess, I really thought it wasn't going to work. I gently rotated an it from hand to hand and after a few minutes the wool began to take shape. I guess gentleness is the key in this step, so your eggs doesn't turn out with lots of visible creases in the wool. I dunked it again in the warm water and gently began to squeeze, while still turning the egg. After a few minutes you will feel the wool fibers tightening and becoming more solid.
At this stage, I dunked it on cold water. This shocks the fibers and makes the felting process stronger. I alternated between cold and warm for a few times till all the soap was rinsed out and the felting process felt complete. There seems to be no exact science to wet felting, everyone seems to do it a little differently. I was happy with my results.
After I did the two eggs I decided I need a chick to go inside. I found this tutorial and loosely followed it. Here is my little chick.
After my eggs and chick had dried overnight, I added the final embellishments. I cut the plastic eggs out of the wool using a zig-zag pattern to create a cracked egg look. I stitched around the opening with embroidery thread. I am not great at hand sewing. Once the chick was dry I cut its wings out and added the beak and feet out of orange craft foam and orange embroidery thread. I would have preferred felt, but I didn't have any on hand. I stitched on the eye with black embroidery thread.
One could always add some candy inside the egg or some other treats and have a really cute and unique Easter gift.
Chocolate Coconut Bird Nests
This afternoon I made some cute and super easy coconut bird nest treats. They were so easy and literally took 5 minutes to make. The original recipe came from here. I adapted the recipe a little. This is how to make my version:
- 1 (12-ounce) package or 2 cups semisweet chocolate chips
- 1 (7-ounce) package sweetened flaked coconut
- Handful of jelly beans or egg shaped candies (I used Whoppers Mini Robin Eggs)
- Melt chocolate chips in the microwave (about a minute for 2 cups). Stir in flaked coconut.
- Drop by tablespoonfuls onto a wax paper-lined baking sheet. Using the back of a spoon press out a hollow to form a nest.
- Divide candy egg pieces among the nests. Chill until firm, about 10 minutes.
Monday, April 18, 2011
I Heart Faces {Wind}
This is a photo I took last evening. There was a glimpse of spring in the air and we walked down to the beach and to get some fresh air and see the sunset. Alex was having fun running and playing and stopped for a minute with this mischievous look, and crazy wind blown hair. What was he up to? Well his next move was jumping over a rock into a tide pool and getting soaking wet, so I guess that was it. I am entering this into the I Heart Faces - "Wind" photo challenge.
Thursday, April 14, 2011
Homemade Play Dough and Easter Cookie Cutters
Alex had so much fun with the play dough that I made for St. Patrick's Day, I decided to make some for Easter. I made 2 batches, one colored purple with white glitter and one colored yellow. I used our favorite recipe from Counting Coconuts. It always turns out great.
He made me a flower too. I think it made from parts of the snake, but its the thought that counts, right? :)
Alex had a great time making bunnies, eggs, and birds with some cookie cutters. His imagination is really growing. He had mommy and daddy bunnies hopping around, swirled Easter eggs, a duck and even made a snake that hatched out of a plastic Easter egg.
 |
| Snake hatching |
He made me a flower too. I think it made from parts of the snake, but its the thought that counts, right? :)
Wednesday, April 13, 2011
A Yarn Basket
I wanted Alex to make his Grandmother a special little Easter gift. So I came up with the idea to make a balloon yarn basket. I remember making them when I was little. So I blew up a balloon, cut some yarn into strips and mixed up some glue with water. Alex dipped the yarn into the glue mixture and draped it over the balloon. He did a few strands and then decided it was "yucky" so I ended up doing the rest.
We let dry for a couple days and then he popped the balloon. This was Alex's favorite part!
We will add a little bit of Easter grass and a few goodies. I really hoping to make some of these.
So there you have it...a cute little Easter gift for "Grammy"
 |
| Checking out the yarn on the balloon. |
We let dry for a couple days and then he popped the balloon. This was Alex's favorite part!
 |
| The eggs were just for photo purposes. |
So there you have it...a cute little Easter gift for "Grammy"
Monday, April 11, 2011
A Story and a Footprint Chick
"There was an old lady that swallowed a chick, I don't know why she swallowed a chick, but she didn't get sick."
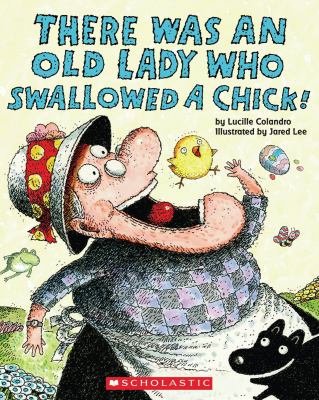
We recently borrowed There Was An Old Lady Who Swallowed A Chick by Lucille Colandro from our library. This is the Easter version of Colandro's "Old Lady" series. It is a silly book with repetitive rhyming text and funny illustration. It was a fun read.
After reading this we made our own silly chick. We made a footprint chick. I painted Alex's foot yellow and he stepped on to a piece of construction paper.
When the footprint had dried Alex glued on some googly eyes, two yellow feathers for wings and a orange beak that I had cut out for him out paper.
Our silly chick was finished!
Sunday, April 10, 2011
I Heart Faces {Shadows}
This weeks photo challenge at I Heart Faces is Shadows. This is a photo of Alex playing at Old Orchard Beach in Maine, last summer. Can you tell I am longing for summer? Tomorrow is suppose to be in the 70s, fingers crossed. We need some warm fresh air to get rid of these head colds.
Check out all the beautiful shadow photography at:
Check out all the beautiful shadow photography at:
Saturday, April 9, 2011
Photo Challenge - Black and White
I love this photo. We were going for a walk (Alex a ride) on a beautiful day when I snapped this photo. Oh how I long for warm spring days. Are they ever coming?
I am entering this in The Paper Mama photo challenge. Check out all the great black and white photos here:
I am entering this in The Paper Mama photo challenge. Check out all the great black and white photos here:
Thursday, April 7, 2011
Marbled Easter Egg Garland
I saw the idea to make Shaving Cream Easter Cards at Little Wonders' Days about a week ago and decided it would be a fun, messy project for us to try. Alex had a blast, he loves anything that makes a mess and they came out really pretty. We made our eggs into a garland.
Here is what we did. I spread some shaving cream on a tray then added some acrylic paint.
Alex swirled it around with a brush
Then he laid a piece of paper on the swirled colors, and carefully lifted it up.
We tried different colored papers. All the directions I read it said to use a squeegee to remove the shaving cream. We didn't have one so I just blotted them with another piece of paper to get off the excess shaving cream and whatever was remaining disappeared when they dried.
After they had dried overnight I cut them into egg shapes, used a hole punch to put to holes in the top and laced them on a piece of embroidery thread. We had some flower cut outs left over from my birthday decorations so I added them in between each egg on the garland. We hung it up on the beam in the middle of our living room. It added a nice little touch of Easter/ Spring to the room.
Here is what we did. I spread some shaving cream on a tray then added some acrylic paint.
Alex swirled it around with a brush
Then he laid a piece of paper on the swirled colors, and carefully lifted it up.
We tried different colored papers. All the directions I read it said to use a squeegee to remove the shaving cream. We didn't have one so I just blotted them with another piece of paper to get off the excess shaving cream and whatever was remaining disappeared when they dried.
The shaving cream was a lot of fun for sensory play too.
and it turned a lovely shade of "yuck" brown. :PAfter they had dried overnight I cut them into egg shapes, used a hole punch to put to holes in the top and laced them on a piece of embroidery thread. We had some flower cut outs left over from my birthday decorations so I added them in between each egg on the garland. We hung it up on the beam in the middle of our living room. It added a nice little touch of Easter/ Spring to the room.
Subscribe to:
Comments (Atom)


